-
Written ByRebecca Kinney
-
PublishedNovember 18, 2024
Operating Room checklists and the infamous timeout are nothing new, so why are they still a topic that needs to be revisited so often? We are human and fallible, and errors happen when it comes to routine tasks. Sprinkle in that each facility has specific negative outcomes that require ongoing modifications for a time to remedy occurrences. This article was inspired by an OR Manager webinar presented by Aileen Killen, PhD RN, and Jeff Robbins, who dove deep into OR Checklists. We will briefly describe how they started, what a good checklist includes, and best practices when executing them in our rooms daily.
History
- 1930s: The checklist originated for pilots following a 1935 crash of a Boeing Model 299 prototype, later known as the “Flying Fortress.” The pilot forgot to release the gust lock.
- 1998: The American Academy of Orthopaedic Surgeons launched the “Sign Your Site” campaign to address wrong-site surgery, responding to growing concerns in the early 1990s.
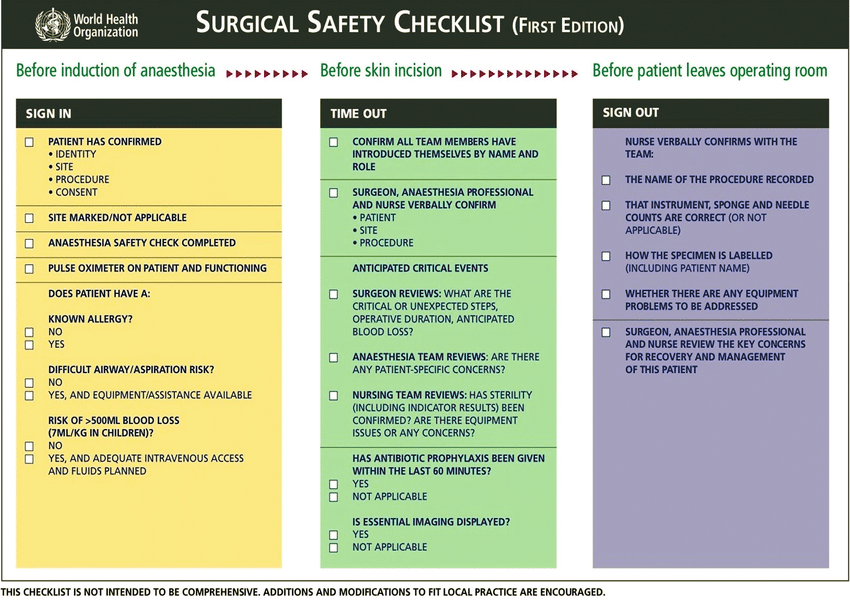
- 2004: Joint Health Commission created the Universal Protocol and time-out; in 2007, the World Health Organization (WHO) implemented the Surgical Safety Checklist (SSC).

- 2008: Surgeon Atul Gawande created the Manifesto Checklist. Today, additions and modifications are still necessary.
Physical Format of the Checklist
- Simple, exact words familiar to the profession
- 5-9 items
- 60-90 seconds to read aloud
- Use Upper- and lower-case lettering (sentence case preferred)
- Fonts: Arial or Helvetica recommended
Key Considerations:
- Who activates it? and What are the pause points?
- Everyone speaks: Allow everyone to introduce themselves, have the timeout caller address team members by name, and have the surgeon or designated person make the “Safety Statement.”
Execution & Best Practices
Aileen Killen, PhD RN, notes, “a short case does not mean a short timeout.” Rushed timeouts can lead to complications, and it only takes a few complications to negate time saved by skipping steps. “I don’t have time: is, therefore, not valid.
Three Components of the Checklist
- 1. Briefing
- Purpose: Establish a procedural plan and align team members on patient details.
- Process: The surgeon reviews patient identity, surgical site, and procedure specifics. Roles and equipment are confirmed.
- Payoff: Reduces risk by ensuring situational awareness and team preparedness.
- 2. Timeout
- Purpose: Verify critical patient and procedure information before incision, preventing errors.
- Process: The team confirms patient identity, site, and procedure, ensuring required equipment is available. Members verbally agree, resolving discrepancies.
- Payoff: Ensures team consensus on details to maintain safety and focus.
- 3. Debriefing
- Purpose: Review outcomes, identify issues, and enhance procedural learning post-operation.
- Process: The team discusses the procedure’s success, complications, and improvement areas. Ask: What went well? What did not go well? What can we do better?
- Payoff: Promotes continuous improvement, supporting quality and safety in future procedures.
Note: You cannot debrief if you didn’t have a brief to start with, and a more thorough debrief may be needed later.
Bonus Ideas
Killen recommends:
- Senior Surgeon Video: Have a senior surgeon or respected staff member create a “perfect timeout” video for staff to view.
- Adapt and Balance: Customize checklists thoughtfully—simple and brief wins.
- Ongoing Monitoring: Monitor, improve, and remove steps as needed.
We share this industry knowledge, hoping to elevate yours. Much of this information was drawn from experts in the OR Manager webinar and OR Today. Check out their webinars for CEs and insights: OR Today Webinars.
Resources
1. OR Manager Webinar | Youtube
2. PMC Article on Checklists and Safety | National Library of Medicine


